
Customizing QBO For Canada Sales Tax
How To Setup Meal Codes
by L. Kenway BComm CPB Retired
This is the year you get all your ducks in a row!
Canada sales tax (GST/HST) calls for annual adjustments of expenses coded to meals. You must add back 50% of your ITCs and the undeducted portion is not claimable. This means you should book the non-deductible portion of the GST/HST to a separate account and NOT lump it into your main Meals & Entertainment expense account.
In September 2015, I attended a Receipt Bank webinar on Canadian sales tax integration with QBO. Their method had you coding the non-deductible portion of the GST/HST in with the tax deductible portion of meals and entertainment. This method means when your accountant prepares your tax return, s/he will over claim your meals deduction. A better practice would be to setup a sub-account under M&E called "GST/HST Not Claimable" and code the non-deductible portion of the sales tax here ... however QBO doesn't allow that. Instead, it books it to GST Expense ... which works.
I will say I did like Receipt Bank's approach which was post and review instead of automatically posting.
Advertisement
Good to Know
CRA's Requirements For
Cloud Computing
Thanks to Marnie Stretch CPB for this tip.
CRA requires you to get permission in writing BEFORE you move your books to the cloud. Why?
Most cloud based accounting software store their data in servers located outside Canada. You need written permission to store your records outside Canada.
See CRA's GST/HST Memorandum 15-2 Computerized Records> place of retention> location outside Canada for more information.
Point 16 states, "Persons with businesses that operate via the Internet and that are hosted on a server located outside Canada should be cognizant of their responsibility of maintaining their records within Canada."
However, when I phoned CRA to find how to do this, the agent didn't know anything about this and wasn't interested in taking the information. The work around is to have a copy of your General Ledger in csv or pdf format on your local computer / hard drive or online as long as the server is in Canada.
When I became certified (2012) for
QuickBooks Online (QBO) Canada, one of the first things I wanted to do
was setup customized QBO GST/HST codes for meals and self-assessing PST.
QBO is different from the desktop version (QBD). It is using a different platform ... which means things don't work exactly the same way in cloud computing land ... and QBO Canada is not as robust as the desktop version ... yet. But Intuit is putting a lot of resources towards it, so it continues to improve day-by-day and month-by-month. In the past three years, Intuit has made enough improvements, including offering warehouse pricing to their ProAdvisors, that I find nowadays there are some things I prefer doing in QBO vs QBD. I still resent that it costs per company file instead of one subscription rate.
Okay, I'll stop my chattering and get started. If you need to refill your teacup, now is the time to do it.
To complicate things just a bit ... my initially did this example using the Classic version of QuickBooks Online Canada. Intuit has since released the Harmony version so I've updated the screen shots.
I'll let you know now that I did make a few mistakes that the software does not let you "undo" ... so I mention them as I proceed so hopefully you don't make the mistakes I did when i was learning QBO.
I'll walk you through the meals setup first, then move on to the self-assessing PST setup. These instructions for setting up Canada sales tax assumes you are using the Canadian version of QBO. The basic steps we'll be walking through are:
- Setup your tax codes (in QBD these are referred to as sales tax items)
- Setup your group rate (In QBD it would be a sales tax group)
Easy Peasy!!!
Canada Sales Tax Center
Meals ITC Sales Tax Code Setup
*ITC=input tax credit
These are the steps to setup Canada sales tax codes. It's a bit different for U.S. sales tax.
Step 1
Select the Sales Tax tab from the left hand menu bar. You should see that Intuit needs a bit of information before it can setup GST/HST and/or PST based on the province your provided in Company Preferences screen. If you have previously turned on sales tax, it should be ready to go.
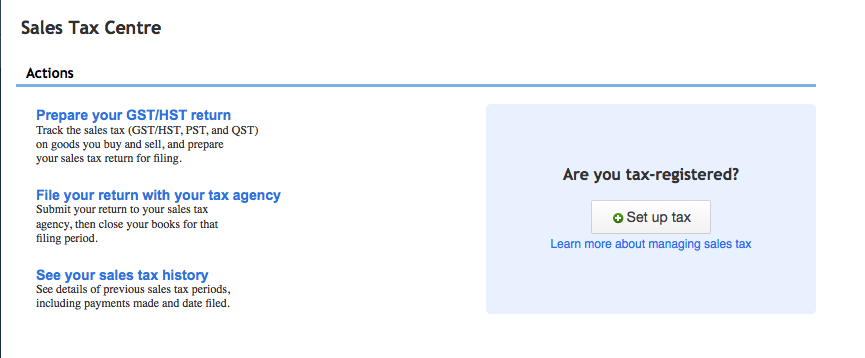 This is what you see before turning sales tax on in QBO.
Intuit automatically sets up your tax codes for your province once you have answered four questions.
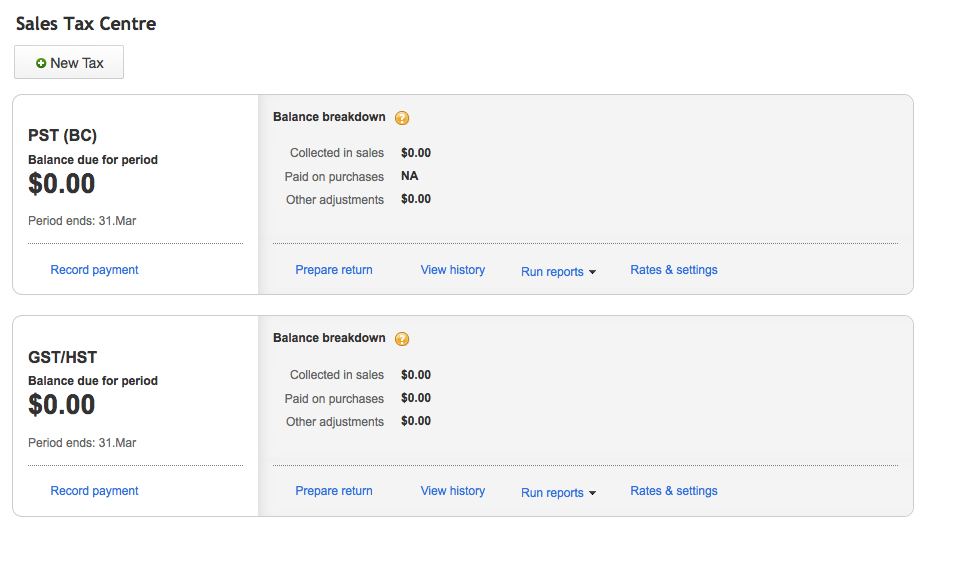 This is what you should see in BC after you answer the questions. HST provinces will only see the HST codes for their province initially.
Step 2
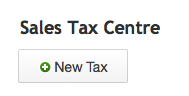
Click on the New Tax button under the menu bar in the upper left hand corner.
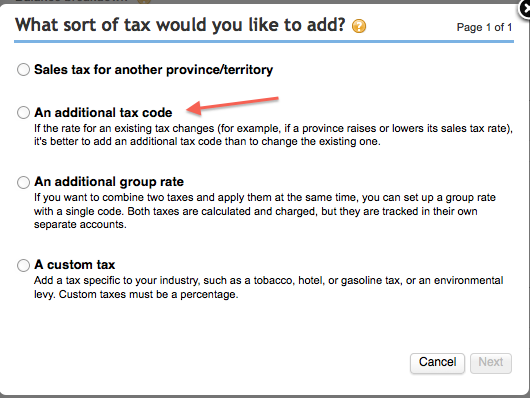
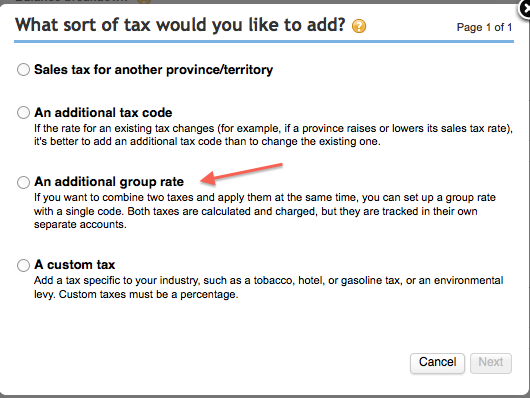
You will see the QBO Canada sales tax module asks you "What sort of tax would you like to add? ... then provides four choices.
As we are creating a Meal code in this example, select your second option - An additional tax code.
You should see a screen that looks like this:
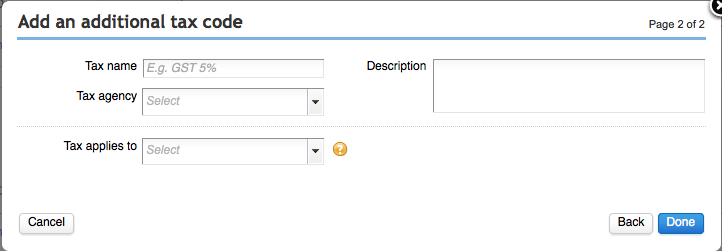
Step 3
Complete the above screen as follows:
Field: Tax name: GST Meal 50% ITC (or you could replace Meal with M&E for meals and entertainment)
If you are in an HST province, then change the name to "HST Meal 50% ITC".
Field: Description: Modify the default description to something that is meaningful to you and/or your staff.
|
Field: Tax agency: Select "Canada Revenue Agency" |
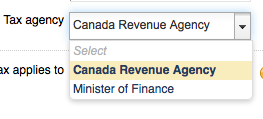 |
|
Field: Tax applies to: Purchases ... once you select Purchases, your screen changes to allow you to input ... this QBO Canada sales tax code does not apply to sales, that is why I selected Purchases. |
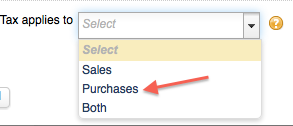 |
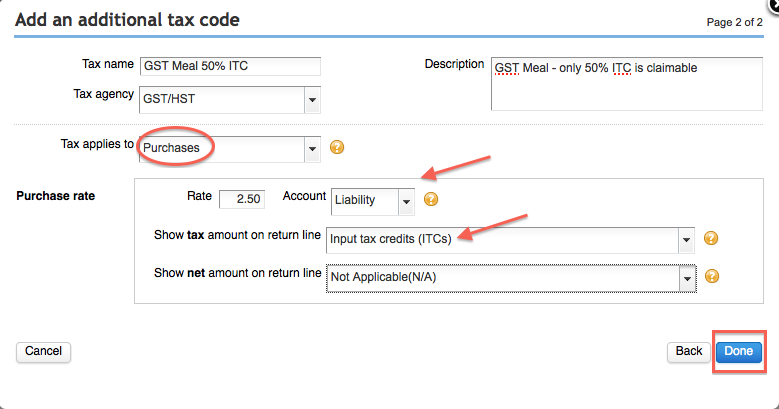
Field: Purchase Rate:
- Set the Purchase Rate to 2.5% if you are setting up the code for GST. An HST sales tax code setup would be half of whatever your curent rate is ... at the time of writing, it would be 6.5% in Ontario, New Brunswick and Newfoundland; 7% in PEI; 7.5% in Nova Scotia.
- Accept the default Liability for the Account field.
- Under Show tax amount on return line ... select Input tax credits (ITCs).
- Under Show net amount on return line ... you have no option but to select the default Not Applicable (N/A).
Step 4
Click on the "Done" button to save your Canada sales tax code.
Here's what my completed screen print looks like after I clicked on the Done button. You won't see this screen unless you go through Ratings & Settings.
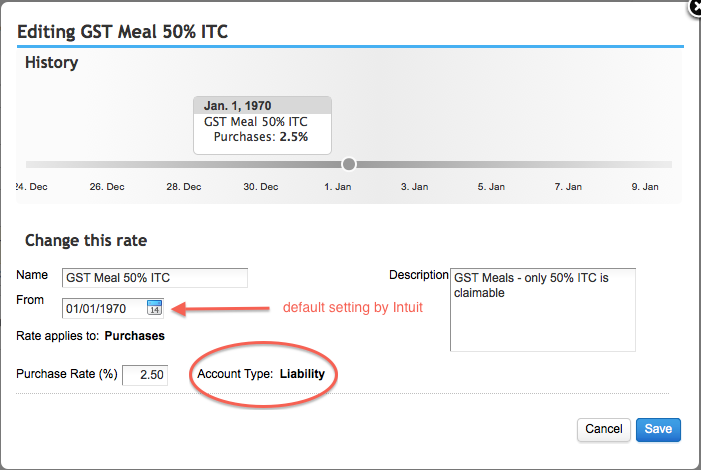
The date field isn't correct, but it was created by Intuit and I have been unable to set it to January 1, 1991 (the date GST became effective in Canada).
Step 5
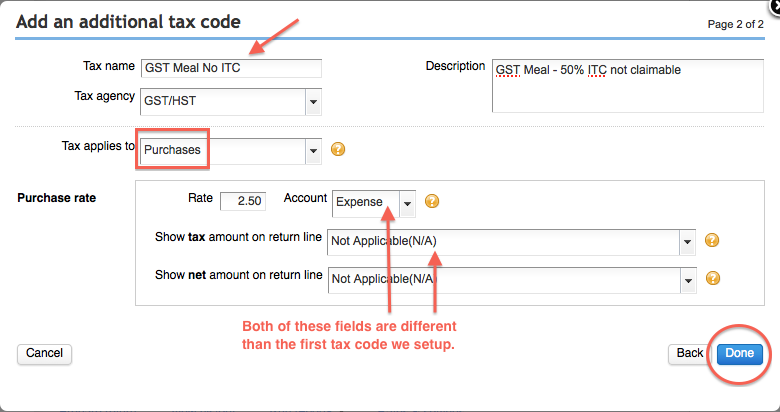
Repeat steps 2 and 3 substituting "GST Meal 50% ITC" for "GST Meal No ITC" (see screen shot below). If you are in an HST province, then make sure you name your QBO Canada sales tax code "HST Meal No ITC".
Make sure you modify the default description as discussed in Step 3.
|
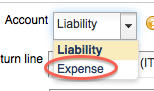
Under the Purchase Rate section, everything is the same EXCEPT select Expense from the Account field drop down menu. This is very important because the 50% of the meal ITC that is not claimable must be expensed ... and is NOT tax deductible. QBO books the non-claimable portion to GST Expense on your income statement. This expenses does not get reported on your GST/HST return. |
 |
Step 6
Click on the "Done" button to save your Canada sales tax code.
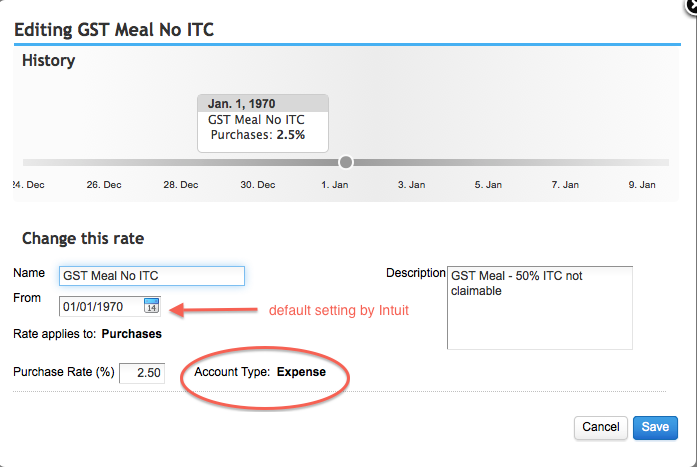
Here's what my completed screen print looks like after I clicked on the Done button. You won't see this screen unless you go through Ratings & Settings.
Step 7
Okay now we need to create a group that calls up both of these sales tax codes ... similar to how the "S" tax code is used to call up PST + GST codes.
Click on the New Tax button under the menu bar in the upper left hand corner.
You will see the QBO Canada sales tax module asks you "What sort of tax would you like to add? ... then provides four choices.
We have already created our two QBO Canada sales tax codes for Meals. Now we need to create the sales tax group for Meals ... the code you will key in on your data entry screen. This time choose your third option - An additional group rate.
You should now see a screen that looks like this:
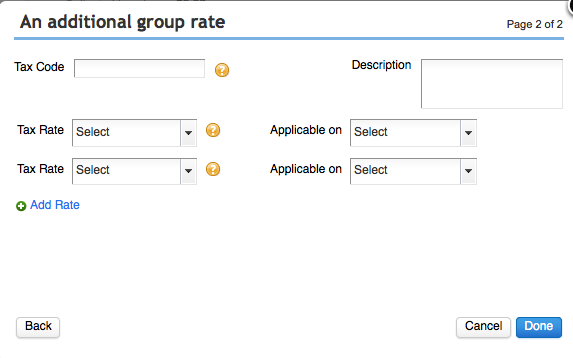
Step 8
Work your way through the screen. Be careful with this screen. Unlike a Canada sales tax code, you CANNOT EDIT the Canada sales tax group once you click on Done! I also couldn't see a way to delete it so I could start again.
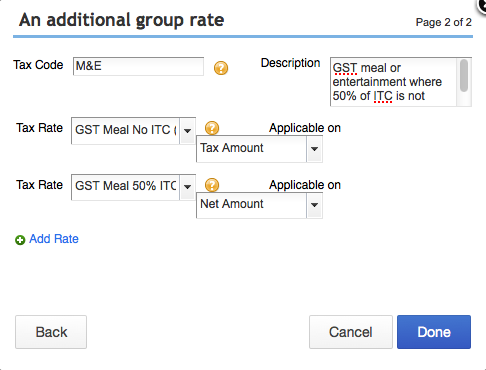
- I named the code M&E with a description of "GST Meal or entertainment where 50% of ITC is not claimable". This is where I goofed the first time I tried it. I initially named the code GST Meal ... but it slowed data entry. I chose M&E instead of GSM solely for faster data entry.
- I selected GST Meal No ITC (Purchases) for the first tax rate ... Applicable on Net Amount.
- I selected GST Meal 50% ITC (Purchases) for the second tax rate ... Applicable on Net Amount.
Step 9
Click on the Done button to save your work.
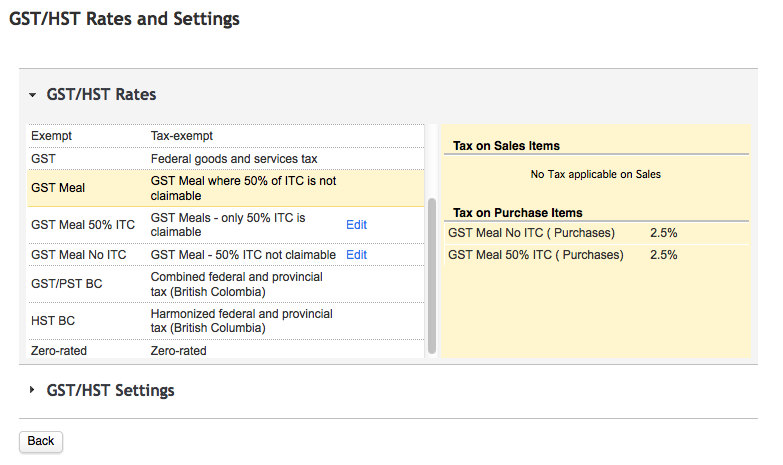
Now take a look at your work by clicking on Rates and Settings under GST/HST.
If you've done everything right up to now, your GST/HST settings should look something like this.
Expense or Cheque
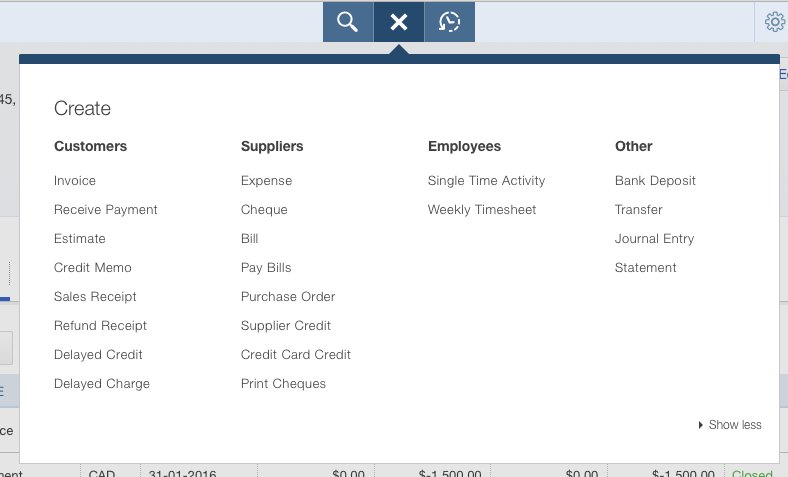
Your choices for entering a purchase transaction are accessed through the Quick Create menu. Under Suppliers, you can choose Expense or Cheque.
Expense is used to enter debit expenses, credit card expenses, preauthorized expensed,etc.
Cheque is used for issuing an actual paper cheque.
Step 10
Let's test our work.
Click on the + at the top middle of your screen. This gives you access to your Quick Create menu. Look under the Suppliers Column and select Expense unless you are issuing a cheque then you would select Cheque. Expense is used for everything else like debit purchases, credit card purchases or cash transactions.
I made a test transaction to see if the QBO Canada sales tax group is working properly. You can see my screen shot of the entry using this tax group below. You can see you can also attach a copy of your receipt to the transaction. I recommend this if you want audit ready books.
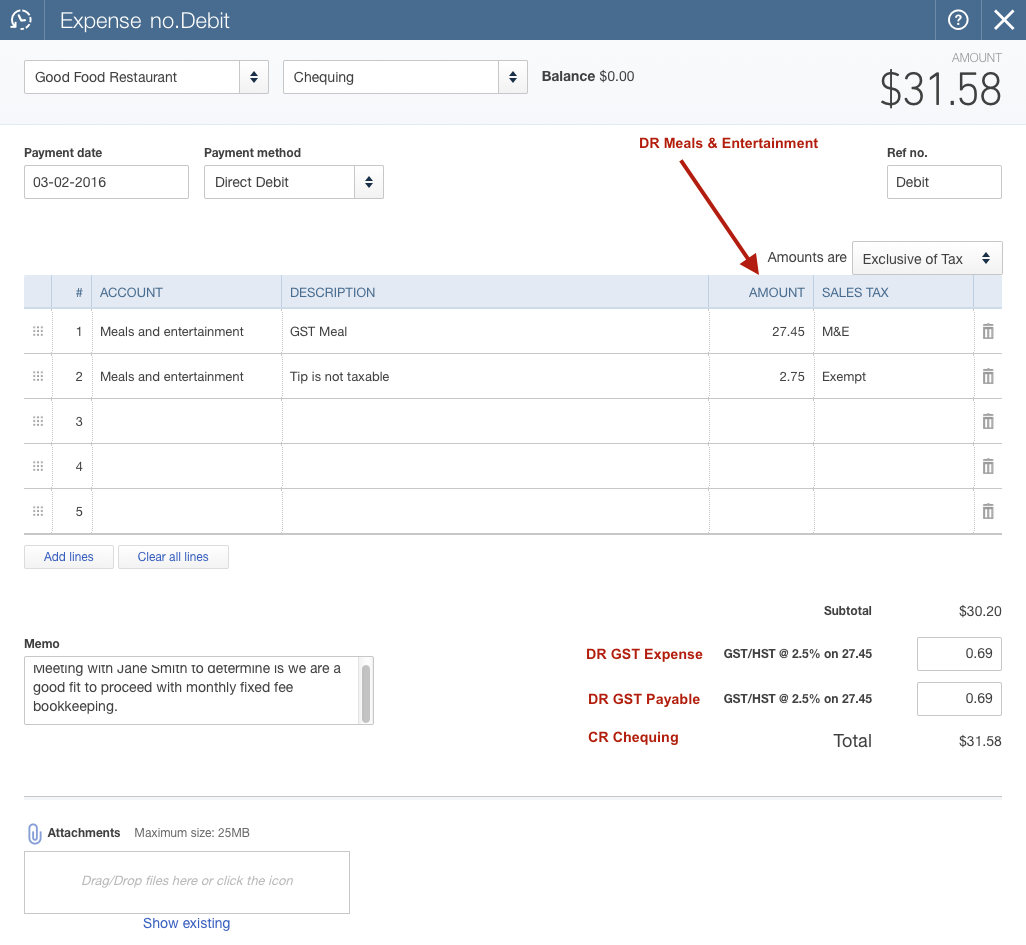
Next I wanted to see if everything was coded to the proper accounts. What I'm expecting to see is:
DR Meals & Entertainment $30.20 ... $27.45 + 2.75
DR GST Expense $0.69 ... for 50% that is not claimable
DR GST Payable $0.69 ... for the amount of ITC I am allowed to claim on my GST Report
CR Cash Transactions $31.58 ... the total amount showing on the cheque expense form
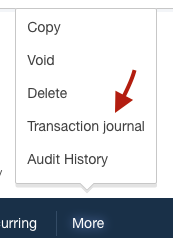
QBO Canada doesn't have the shortcut key CTRL+Y like the desktop version. You find your transaction journal by going to 'More' at the bottom of your transaction screen.
The transaction journal confirms that my data is going to the correct accounts.
Let's look at how this presents on the balance sheet.
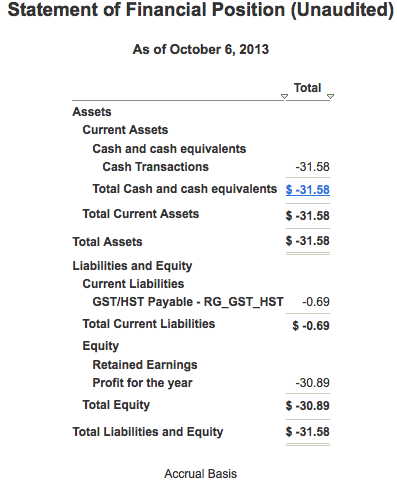
Just to keep you on your toes ... does it bother you that the Cash Transactions account is showing $-31.58 ... and the GST Payable account is showing a $-0.69.
Well we did want the Cash Transactions to be a credit ... and it is ... so that's okay. But why is the GST Payable showing a negative sign?
Remember the normal balance for a liability account on the balance sheet is a credit. We coded an input tax credit which means we don't owe CRA money, they owe me ... so a negative in this section of the balance sheet means it is a debit. ... which is what I was expecting.
Canada Sale Tax Center
Difference & Limitations
At the start of this chat, I said that the online version of QuickBooks is not as robust as the desktop version ... but its functionality is continually improving. Here are a few limitations/differences I've noticed so far:
1. The QBO Canada Sales Tax Centre is quite unforgiving. It did not let me edit or delete any customized sales tax group.
- You should also know that as you move around QBO itself, no module really has a "delete" feature like in the desktop version. The software uses delete and inactive interchangeably. Either action only hides it. If you delete an account with a balance, it will move the balance the Open Balance Equity then add (deleted) to the affected account name. Click on 'Make Active' to bring it back. Most gear menus have the 'show inactive' boxes you can click to show or hide these deleted / inactive accounts or lists. Deleted transaction can be found in the Audit Log if they need to be restored.
- If you want to void a transaction rather than delete it (because you want your numerical audit trail) then just zero out the transaction and add Void after the number and in the memo section.
2. When you go to pay your sales tax, you'll notice a new default account in QBO Canada called GST Suspense. It acts as a clearing account. In the desktop version, the entry would have been posted to Accounts Payable (or Accounts Receivable).
3. I wasn't really happy that I couldn't direct the GST Expense portion of this Canada sales tax to a sub-account under Meals called "ITCs not claimable". I had to accept the default expense account which may or may not include some expenses that would still be claimable even if they are captured separately.
4. I couldn't see a way to assign a default sales tax code to my supplier. It seems like a real time waster to me that I have to select the sales tax code for every line of data. As Intuit is continually improving the features, I am hoping this one is on their list. It will recall your last transaction for the Supplier, so this will help ... except when your last transaction was an exception.
5. Transaction journal is found differently in the online version as explained above. Click on 'More' at the bottom of your page.
6. Initially I no longer had a sample company file to play around in. I really disliked having to create (and delete) bogus transactions in a "live" file. It meant I had to continually sign up for free trials to test transactions I am unsure about ... but as Intuit is always improving their products which is one of the reasons I'm such a big fan of theirs. You can now access a sample company by clicking on your gear > Your Company > Sample Company. Excellent!
7. Terms have switched which initially makes it confusing when switching from desktop to online. You can't use a shortcut key to get to many of these but you go through the side navigation panel, the Quick Create Menu (+ sign at top of screen) or through a gear icon.
| QBD Names | QBO Names |
|---|---|
| Vendors | Suppliers |
| Items List | Products & Services List |
| Memorized Transactions | Recurring Transactions | Preferences | Company Settings |
| Memorized Reports | My Custom Reports |
| Credit Card Charge | Expense | Audit Trail Report | Audit Log Report* | Tax Codes | Sales Tax Items | Sales Tax Group | Group Rate* |
*Also tracks user logins and logouts
8. There are a lot less keyboard shortcut keys in QBO versus QBD. You can get the list from anywhere in QBO by clicking on CTRL+ALT+? (Mac users - COMMAND+ALT+?). I recommend you take a snapshot of the list to keep open on your desktop while learning your way around QBO. Your basic QBD shortcut keys still work in QBO.
9. You can have more than one screen open in QBO by opening a new window (tab) through QBO. Look in the gear icon menu to go this. In QBOA, the Accountant's Toolkit Menu also has the 'New Window' option.
10. QBO is optimized for use with the Google Chrome browser. Firefox and Safari also work. It does not function well with the Internet Explore browser. If you want to work in multiple companies, you do so by opening different browsers - one browser for each company.
11. It will be frustrating for long time QBD users when you first start working in QBO. You need to remember to refresh your open window screens to update / refresh the data.
Next I'll move on to how to create a made in Canada sales tax code for self assessing PST ... I live in B.C. where unfortunately we went back to our archaic PST system in April, 2013. I know, I know ... you're thinking Boo Hoo ... stop crying and let's get on this chat!

See you on the next page ...
Your tutor
12 Part QuickBooks® Primer


QuickBooks® is a registered trademark of Intuit Inc. Screen shots © Intuit Inc. All rights reserved.
Click here to subscribe to QuickBooks Online Canada. I do not receive any commissions for this referral.
Bookkeeping Essentials > Accounting System Software > Customizing Sales Tax Codes